
When we last left off, we had finished up the retopo of our outfit in Maya.
There are a few key steps to go from there to a final in-game asset:
Clean up UV’s
Bake Normals from our High-poly source mesh
Paint our texture in Substance Painter
Bake out the final texture maps
Load into Character Creator and apply skinning so we can animate the clothing
Export to 3ds Max so we can strip the body mesh from the FBX
and finally, load the clothing into Unity and add to our customization system
This may feel like a lot of steps remaining, but a good chunk of these are one or two click operations for the most part – the most lengthy / time consuming step is actually the work in Substance – the rest of the steps are fairly straightforward.
For this entry in the series however, I’m going to focus on something that I didn’t cover in the last entry – UV Layout in Marvelous Designer!
Prepping our Model UV Layout – Non-Overlapping UV’s
As you may recall, in the last entry of this series, I showed how you can use the Transfer Attributes tool to transfer UV’s from one mesh to another, and then to use that same UV Space to wrap our 2D mesh back onto the original 3D mesh.
With so many critical steps in the retopo workflow dependent on having proper UV maps for our mesh, I felt that it was important to cover how we can use Marvelous Designer to actually create a proper UV Layout for our clothing from the beginning (something I did not do for the previous outfit).
Let’s consider a clothing item like this (created by BelBel on either ArtStation or CubeBrush)
CropTop Marvelous
It’s a nice simple clothing item that would be very easy to retopo using our previous workflow – with one exception – the UV Layout!
Marvelous Designer (at least the newer versions – I’m on version 8) provide a built in UV Editor for your outfits – which is fantastic because we can prep the clothing with nice UV’s right from the beginning, and save ourselves from having to clean up the UV”s later on!
In the upper right of MD there is a dropdown to switch to the UV Editor from our 2d pattern window:
UV Editor – Marvelous Designer
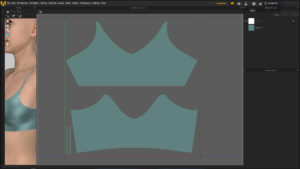
If you are creating an outfit from scratch, the UV layout will basically be the same as the 2d Pattern – however in the case of the outfit above, the UV layout does not match the 2d layout:
CropTop – UV Layout
Here you can see that the 2 upper straps are overlapping in position – which makes sense for surfacing purposes, but will actually cause issues when we use the Transfer Attributes tool in Maya later on!
Why is this? Let’s think it through – if you recall from our last entry – we do a few operations that are very dependent on our UV layout:
projecting the UV’s from our source 2D mesh to our Retopo’d 2D mesh – done in worldspace
Projecting the 2D mesh back onto the 3D mesh using the UV Layout
It’s the second step that will cause us issues if we have overlapping UV’s – basically when we try to project the 2D mesh back into 3D space, the Transfer Attributes tool won’t be able to properly map the vertices for the straps in this outfit – we have 2 unique straps, but they both occupy the same UV space!
So in general, the best practice if you are using the Retopo workflow that I’ve described is to ensure that you have clean, non-overlapping UV’s from the start!
Additionally, the UV Layout just doesn’t really make sense – for realtime, we want the UV’s for assets to be within the 0,1 UV space – in fact if we were to export the asset out of the box it would generate SIX UV tiles (UDIM) for this simple layout – which just won’t do.
Luckily, since we can tweak the clothing UV’s directly in Marvelous, we can not only create our clothing, but also ensure that we have a nice set of UV”s for the rest of the process at the same time!
In general, I’d recommend spending the extra few minutes up front to ensure that the UV Layout for your clothing is nice and clean in Marvelous – before you start the rest of the retopo / prep workflow. It takes next to no time at all in Marvelous and will save yourself doing cleanup of the assets later on!
