
A Retopology Pipeline – Marvelous Designer & Maya
I’m far from an expert at retopo (in fact I just figured out this workflow in the past few days), but it is very straightforward and is working well for me, so I want to document it for my own sake as well as for anyone that might encounter this in the future ;}
The basic concept is explained very well in this video (this is where I discovered the workflow);
The basic steps are:
we will use Maya’s Quad Draw mesh tools with the 2d projected mesh that we exported from Marvelous. This gives us a nice clean (and flat) mesh to do the retopology on.
Using the Transfer Attributes tool, we will transfer the UV set from the 2d mesh onto our new retopo’d mesh. This gives us a working UV set for our Retopo’d mesh that matches the Marvelous layout
Finally we will use the Transfer Attributes tool to project the Retopo’d mesh onto the original 3d mesh using the UV projection. This will ‘wrap’ the retopo’d mesh onto the original source mesh via the UV Layout.
This basic workflow is extremely straightforward and can be used for ANY marvelous designer-based clothing.
Let’s take a look at what this involves.
Step 1 – Prep your clothing in Marvelous Designer.
You want the avatar to be in either a T or A Pose, with their legs spread so that any clothing geo from the legs or arms are not overlapping. This is very important when we get to skinning the clothing later on.
Step 2 – Export the base OBJ from Marvelous.
This will become the high-poly mesh that we will use to bake normal maps etc from later on
It is important to export the OBJ with ‘Unified UV Coordinates‘ checked and use ‘Single Object’, ‘Thin’
Marvelous Export OBJ
Step 3 – Export a ‘flattened 2d’ version of the mesh.
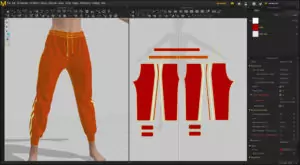
This will be used for our actual Retopo work. In the 3d viewport of Marvelous, select the clothing in the 3d viewport and ‘Reset 2D Arrangement’Export this Flat 2d Mesh as a separate OBJ using the same settings as above.
This gives us the info we need from Marvelous to create our game ready clothing.
Import the 3d and 2d meshes into a new Maya Scene
In Maya, create a new scene and import both of the OBJ that we’ve created into the same Maya scene
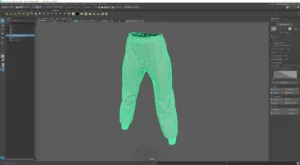
the 3d Mesh:
and the 2d flat mesh:
We’re ready to start doing the Retopology for our realtime version.
As you can probably see from the images above – Marvelous gives us an awesome detailed mesh with all of the folds & details from our clothing, but it is pretty dense and not very ‘real-time’ ready. In particular trying to rig or texture clothing like this would be a messy proposition.
Use QuadDraw to sculpt the retopo’d mesh
During this stage you can hide the 3d mesh in Maya (select & press -H).
First we need to make the 2d mesh that we’ve import into a ‘Live Surface’ – this tells Maya that any operations going forward, any tools and operations snap to the object in question.
Select the 2d Mesh and click the ‘Magnet’ icon on the top menu bar:
Maya Live Surface
The 2d mesh will unselect and the name of our 2d mesh will be listed beside the magnet, as shown above
Next, open the Modeling toolkit via the icon in the upper right:
Modeling Toolkit
On the Modeling Toolkit panel you should see the Transform Constraint set to “Live Surface”, indicating that all of the operations that we will do with the toolkit will be relative to the 2d mesh in the scene.
Transform Constraint – Live Surface
Activate the Quad Draw tool – this will let us start plotting out the new topology for our realtime low poly mesh for the clothing.
The tool is very helpful and shows a full set of shortcuts on the panel while active in case you forget (or are like me and have the memory of a goldfish)
Quad Draw Shortcuts
Having gone through this with a few items so far the trick is to not worry too much about adding too much geometry, in fact it’s actually counter-productive to do so – what you want to focus on is defining the edge flow for the clothing mesh so that it will drape properly and makes sense from a geometry standpoint.
For example, here’s one of the legs from the clothing item above – as you can see, I’ve used big / rough strokes to define the poly / edge loops so far:
Leg Retopo Rough
Keeping the layout simple like this will simplify my work later on – when I have to weld the geo together for the final mesh – and it is a single click to apply a ‘smooth’ modifier once I’m ready to ‘up res’ the retopo to the final game resolution that I’m looking for, like so:
Leg Retopo Smooth
There are much better tutorials than this (and infinitely more talented artists than I) that can explain how to best define your topology / strategies etc. Suffice it to say that you just want to get the rough shape of your soon-to-be game mesh setup with the Quad Draw flow, without adding too much unnecessary geometry that will cause us more work in the steps to come.
In the end, the most important detail to remember when adding geometry for the retopo is that any sides of the mesh that will need to be welded together must have the same number of vertices – so for the outfit above, this maps to the following for the core leg geo:
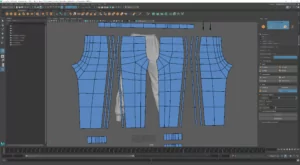
As you can see – from top to bottom, each section of the clothing has the same number of points – which will make it very easy for me to weld the mesh back together afterwards.
Fast forward a bit and here is my entire 2d mesh ready to go:
Mesh 2d Retopo
Transfer Attributes tool – Step 1 – Transfer UV’s
As you can see, Maya’s QuadDraw tool lets you very rapidly define the new retopo’d geometry that we will use for our realtime mesh. We will use the ‘Smooth’ modifier later on to re-add some of the geometry detail into the mesh – but we have a nice clean low poly base to use for our next steps of iteration.
Another question that you are likely asking is – So how do we get this 2d retopo’d mesh back into the 3d piece of clothing that we started with?
This is where a super powerful tool that Maya provides comes in – and in fact is the exact reason why I’m doing this retopo work in Maya instead of 3ds Max (which is my normal tool of choice) – the Transfer Attributes tool.
This tool does effectively what it says – it allows you to transfer a variety of attributes from one mesh to another.
The first step that we want to do is to transfer the UV Layout that our original mesh has from Marvelous onto our new retopo’d mesh.
To compare – the UV Set that QuadDraw gives us out of the box looks like this:
QuadDraw UV Set
Which, as you can probably guess, is…not so useful.
However, if we look at the UV Set from EITHER / BOTH of the meshes that we exported from Marvelous Designer, we will see that both UV set are identical – and this is exactly how we can remap the 2d mesh back onto the 3d mesh in the end.
UV Set 2d Marvelous
There are 2 steps that we need to take to go from our 2d retopo’s mesh back to 3d clothing.
First, we need to transfer this Marvelous UV set onto our new Retopo’d mesh.
What this means is that we have 2 meshes – the 2d source (our marvelous designer 2d mesh) and a 2d destination (our new retopo’d mesh) in the same worldspace position in the Maya scene, as shown in the gif below:
We are projecting the UV’s from the source mesh onto the retopo’d mesh – so the UV regions in worldspace are mapped onto our new retopo’d mesh.
In Maya, select our Marvelous 2D mesh (the source for our transfer operation) and then select the new Retopo’d 2d Mesh (the destination) and open the Transfer Attributes window.
What we want to do is transfer the UV Set from the Source Mesh onto the Destination mesh using the World sample space:
Transfer Attributes UV Worldspace
The end result is that our new Retopo mesh has the same UV layout as our original Marvelous designer 2d mesh.
UV Set transferred onto our Retopo’d mesh
The Transfer Attributes tool is amazingly powerful for this type of operation – you can have meshes with vastly different mesh topology (like our 2 meshes here) and remap UV’s and much more from one to another easily.
Transfer Attributes Tool – Step 2 – Remap Retopo mesh into 3d space
This last step uses the Transfer Attributes tool again – except in this case we are remapping our clean Retopo mesh back into 3d space using the original 3d geometry we exported from Marvelous. This is where we will finally be able to see the results of the retopology and verify that all of our hard work to date will pay off.
First, let’s open the UV Editor again and we can see how the 3d mesh that we exported originally has the same UV coordinates as our new 2d Retop mesh.
UV Layout – 3d Source mesh and Clean Retopo mesh
As we can see – the original 3d Marvelous designer mesh is in the same UV Space as our clean Retopo’d mesh. We can use the Transfer Attributes tool to project our clean mesh back into 3d space using the UV Layout!
For reference – here is a screenshot of the settings that I’m using for the Transfer Attributes window:
Transfer Attributes – Vertex Positions
To do the transfer we first select the original 3d Geo (the source that we are using to project) and then the Retopo mesh (what we are transfering onto) – we are using the UV coordinates of both mesh to transfer the vertex positions of the original mesh onto the new retopo’d mesh.
And here’s a gif showing the newly reprojected low poly mesh onto our high poly source mesh – this tool is truly amazing:
Retopo Projection onto Source Mesh
Now if we take a look at our two meshes (source and retopo), there are a few things that you’ll spot immediately:
The geo (particularly around the lower area of the leg) doesn’t match up very well
Once we’re done we will need to weld the new retopo’d mesh together
This is simply because our retopo mesh doesn’t have enough vertices to remap onto the source mesh accurately – but overall, even with such a simple retopo mesh, we’ve done a pretty good job of capturing the high-res source mesh’s basic shape!
The obvious solution is that we need to add some additional edge loops / detail to our retopo mesh before we project it back into 3d space – HOWEVER – the second point that I mentioned above is something that you need to be aware of – every new set of verts that we add to our retopo mesh at this stage will need to be welded to reconnect the mesh together!
Next steps : Weld the new low-poly mesh together
Now that our low poly retopo mesh is ready – we can quickly weld the mesh together using the Mesh tools in Maya (using Target Weld) – you can use this to verify that you properly setup the retopo so that all of the edges can be welded properly.
Unwelded retopo mesh
Something you may notice at this point when you try to weld your mesh is that the Weld action is very slow – to the point that (for me at least) it feels like Maya has actually crashed.
The reason for this is due to the fact that Maya retains the history of each action that you take on a mesh – so modifying the mesh (via a weld action) is ACTUALLY applying that weld and then re-applying the entire set of actions (including the above attribute transfer) again for each action.
Now this is obviously not going to fly (at least not for me, it’s far too slow to actually work) – so we can do a trick in Maya to optimize our scene – by using the ‘Delete History’ action.
Now Delete History sounds ominous, and in certain ways it is – this is sort of a point of no return for a scene – so I would make sure that you have a good backup of things (you HAVE been using the ‘Increment & Save’ method throughout, right?)
To delete the history on our mesh go to Edit->Delete by Type->History
Now, we can get back to quickly rewelding the mesh together – here’s my welded low poly mesh:
Welded Low Poly
Now this mesh might be fine if we are targeting mobile (or playstation 2), but in our case, I want to actually bump the poly count back up a bit now that I have the mesh rewelded together. There were some inconsistencies between the low polymesh and my source highpoly mesh that the low poly isn’t representing very well (folds / creases etc).
Now a lot of this we can capture when we get to the point of baking the normal map later on, but there’s a few things we can quickly do to improve the mesh in question.
The easiest way to bump our poly count is to apply a Smooth modifier – simply select the mesh, and in the Mesh Tools select ‘Smooth’.
This will open a small dialog that prompts us for the number of divisions that we want to apply:
Smooth Modifier
Let’s bump it to 1 to start – you should see the mesh immediately start to look a bit more like what we’d expect for a modern game asset!
Smooth Modifier – level 1
Now that the mesh is coming together, I’m going to do a bit of cleanup and work on the UV’s and then we can take it into Substance and bake out a normal map – will cover that in the next post in the series!
Hope this helps, and have fun creating your wardrobe!
