
This weekend I just reset my laptop (was having some strange issues with ssh), so figure this is a great time to write a simple post about how to configure your workstation to use OpenUPM.
What is OpenUPM?
Check out the Dev Blog post that I wrote on the topic for an intro, but the TLDR is that Unity’s Package Manager supports the ability to use your own ‘Scoped Registries‘ to host / pull packages from.
If you’ve ever done any work with Node.JS, you’ve probably encountered similar package systems (NPM for example). Visual Studio / .Net development has their own .Nuget package management system etc.
In our case, NPM is particularly relevant, as Unity’s package system is effectively the same thing (it’s not under the hood, but close enough for our purposes).
What does OpenUPM provide to us as Unity developers?
The first thing is that there is an ever-growing set of awesome packages added and supported by the community, and second – it is an excellent way to manage / distribute your own packages!
Getting Started with OpenUPM
First, go to OpenUPM.com. On the home page it shows us the following info:
Getting Started with OpenUPM
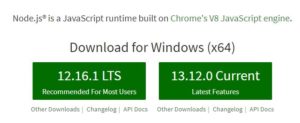
To get started, the first thing we need to do is install NodeJS. NodeJS is a javascript runtime built on the same javascript engine that powers the Chrome browser.
Go to the Node.js website (https://nodejs.org/) and download the latest LTS installer (as of this writing, version 12.16.1):
Run the installer, the default options are fine – the important point that we want to make sure of is that you are adding Node to our system ‘Path’, as shown in the image below:
NodeJS Installer
What this means is that we will be able to run node commands from a command prompt, which is a key part of the OpenUPM workflow.
Once the installer completes it will open a window like this:
Node post install actions
We’ll let this run and do it’s thing, completing the Node setup. On my machine, this popped an additional PowerShell window to do the install of ‘Chocolatey’, a tool that helps build additional Node tools from C++.
Node post install actions PowerShell
Completing all of the install steps may take some time – again, just let it do it’s thing until it’s completed. You might need to hit ‘enter’ a few times in the terminal as it completes.
Test Node is setup
Now that the install is done, let’s test that Node is installed and behaving – open a command prompt (Start-Run, type ‘cmd’ and hit enter):
Type the following:
Node -v
in the command prompt and hit enter. It should respond with the following:
Node verify & version
Looks like things are working! Next let’s verify NPM is behaving properly, and also update it to the latest version:
npm -v
To check that NPM is working, and then
npm install npm@latest -g
Which will kick the NPM update process. This may run for a while as NPM checks and updates itself to the latest version.
Update NPM
The -g parameter at the end is important – Node has the concept of scopes for all of it’s internals, packages etc – you can either install a package locally for a given / particular project or ‘globally’, meaning that it is available for all projects / scopes. In our case we want to update NPM globally on the machine, so we add the -g parameter.
We’ll do the same with OpenUPM when we install it in the next step. While the above might seem like quite a bit, in practice you can get Node setup and configured pretty quickly.
Installing OpenUPM
Ok, we’re finally ready to install OpenUPM and start using it!
Let’s refer back to the instructions from the OpenUPM website:
# Install openupm-cli
$ npm install -g openupm-cli
# OR yarn global add openupm-cli
Side note: Yarn is a separate package management system for Node – the fun of the open source community is there is often multiple ways to do things, and Node is no different. We can just ignore that for now.
In the same command prompt that we used before (or a new one if you closed it), type:
npm install -g openupm-cli
This instruction tells NPM that we want to install the package ‘openupm-cli’ globally for our PC:
Install OpenUPM globally
That’s it! OpenUPM is ready to go!
Using OpenUPM
So now what? It’s pretty simple actually. All of OpenUPM’s actions are project-specific, meaning you call OpenUPM commands in the folder of a Unity project and it will do the hard work for you – updating the project manifest etc.
Let’s add a package to one of the projects that I have on my machine.
You can open the Unity Hub and grab the path to a given Unity project easily – click the 3 dots at the end of the entry in the Unity Hub and it will pop a menu like this:
Unity HUB
Click ‘Show in Explorer’ – this will open Windows Explorer and show you the path to the project:
In Windows Explorer, click in the file path and copy the path:
Explorer copy path
Then you can go back to your command prompt (or open a new one) and type:
cd [path/to/project]
and then ‘paste’ the path (ie we want to ‘change directory‘ to the path specified. In the command prompt you can simply right click to paste the path (or press Ctrl-V) and press enter to change to the folder specified
Once you’ve done this, you need to figure out what package you want to install from the OpenUPM library. In my case, I want to install my Pixel Wizards Utilities package (it’s one of the first I install for any project), so I’ll search in the OpenUPM search field:
OpenUPM Search
and then navigate to the package details page (https://openupm.com/packages/com.pixelwizards.utilities/)
On each of the package’s detail pages in the upper right there is a quick shortcut for the command to install the package:
Copy Package install instructions
So I’ll just click on that and then go back to my command prompt and right click to paste and hit enter to add the package:
OpenUPM Install package
As you can see, OpenUPM has updated the manifest – the next time we open this project the package will be pulled from the OpenUPM registry and you’ll be ready to go!
How does OpenUPM work?
Now if you’re like me, you want to know more specifics about what exactly OpenUPM is doing to my project’s manifest – so let’s open the manifest for the project above and take a look!
{
  "dependencies": {
      "com.pixelwizards.utilities": "0.2.0-preview.1"
  },
  "scopedRegistries": [
    {
      "name": "package.openupm.com",
      "url": "https://package.openupm.com",
      "scopes": [
        "com.openupm",
        "com.pixelwizards.utilities"
      ]
    }
  ]
I’ve removed the rest of the manifest to highlight what exactly OpenUPM has added.
First, it added a new dependency to the project, namely “com.pixelwizards.utilities” and specified the package version to load (0.2.0-preview.1 in this case)
It has added a new ‘scopedRegistries’ section at the bottom. This is the magic, and how we tell Unity’s package manager where to find the packages in question!
That’s it! Adding new packages to our project from OpenUPM is done the same way – simply opening a command prompt in the folder of our project and calling the appropriate openupm command:
openupm add [packagename]
For more details about OpenUPM and how it works, their documentation is fantastic:
And if you like what the OpenUPM maintainers are doing, please add your own packages and consider supporting the project on Patreon – I am!
Enjoy!
